Product Repository #
During the first boot of a newly deployed VMware Cloud Provider Lifecycle Manager appliance, the system automatically creates the product directories and sets their permissions. You can either upload the product binaries to the respective directories or mount an existing pre-configured repository directory. On VMware Cloud Provider Lifecycle Manager, you must store the product deployment and upgrade files in the respective product directories.
Upload the Product OVA Files to the VMware Cloud Provider Lifecycle Manager Appliance #
You must upload the product OVA files and product update files to a specific pre-defined file structure. After the first boot, VMware Cloud Provider Lifecycle Manager creates a separate repository folder for every product that the appliance can manage. You can configure the permissions for every directory. As a result, the files within the directory inherit the permissions you configure on the directory level. At a later stage, if you add a new file to a product directory, the new file does not inherit the permissions from the directory and you must configure the 755 permissions on a directory level again.
Procedure #
Create Repository directory structure for new deployment.
mkdir -p /opt/vmware/cplcm/cplcmrepo/{rmq/rmq_version-number/ova,usage/um_version-number/ova,vcd/vcd_version-number/ova,vropsta/vrops_version-number/ova}
Example
[user@localhost]$ mkdir -p /opt/vmware/cplcm/cplcmrepo/{rmq/3.8.14/ova,usage/4.3.0/ova,vcd/10.2.2/ova,vropsta/2.5.0/ova}
Create repository directory for product update files
mkdir -p /opt/vmware/cplcm/cplcmrepo/{rmq/rmq_version-number/update,usage/um_version-number/update,vcd/vcd_version-number/update,vropsta/vrops_version-number/update}
Example
[user@localhost]$ mkdir -p /opt/vmware/cplcm/cplcmrepo/{rmq/3.8.14/update,usage/4.3.0/update,vcd/10.2.2/update,vropsta/2.5.0/update}
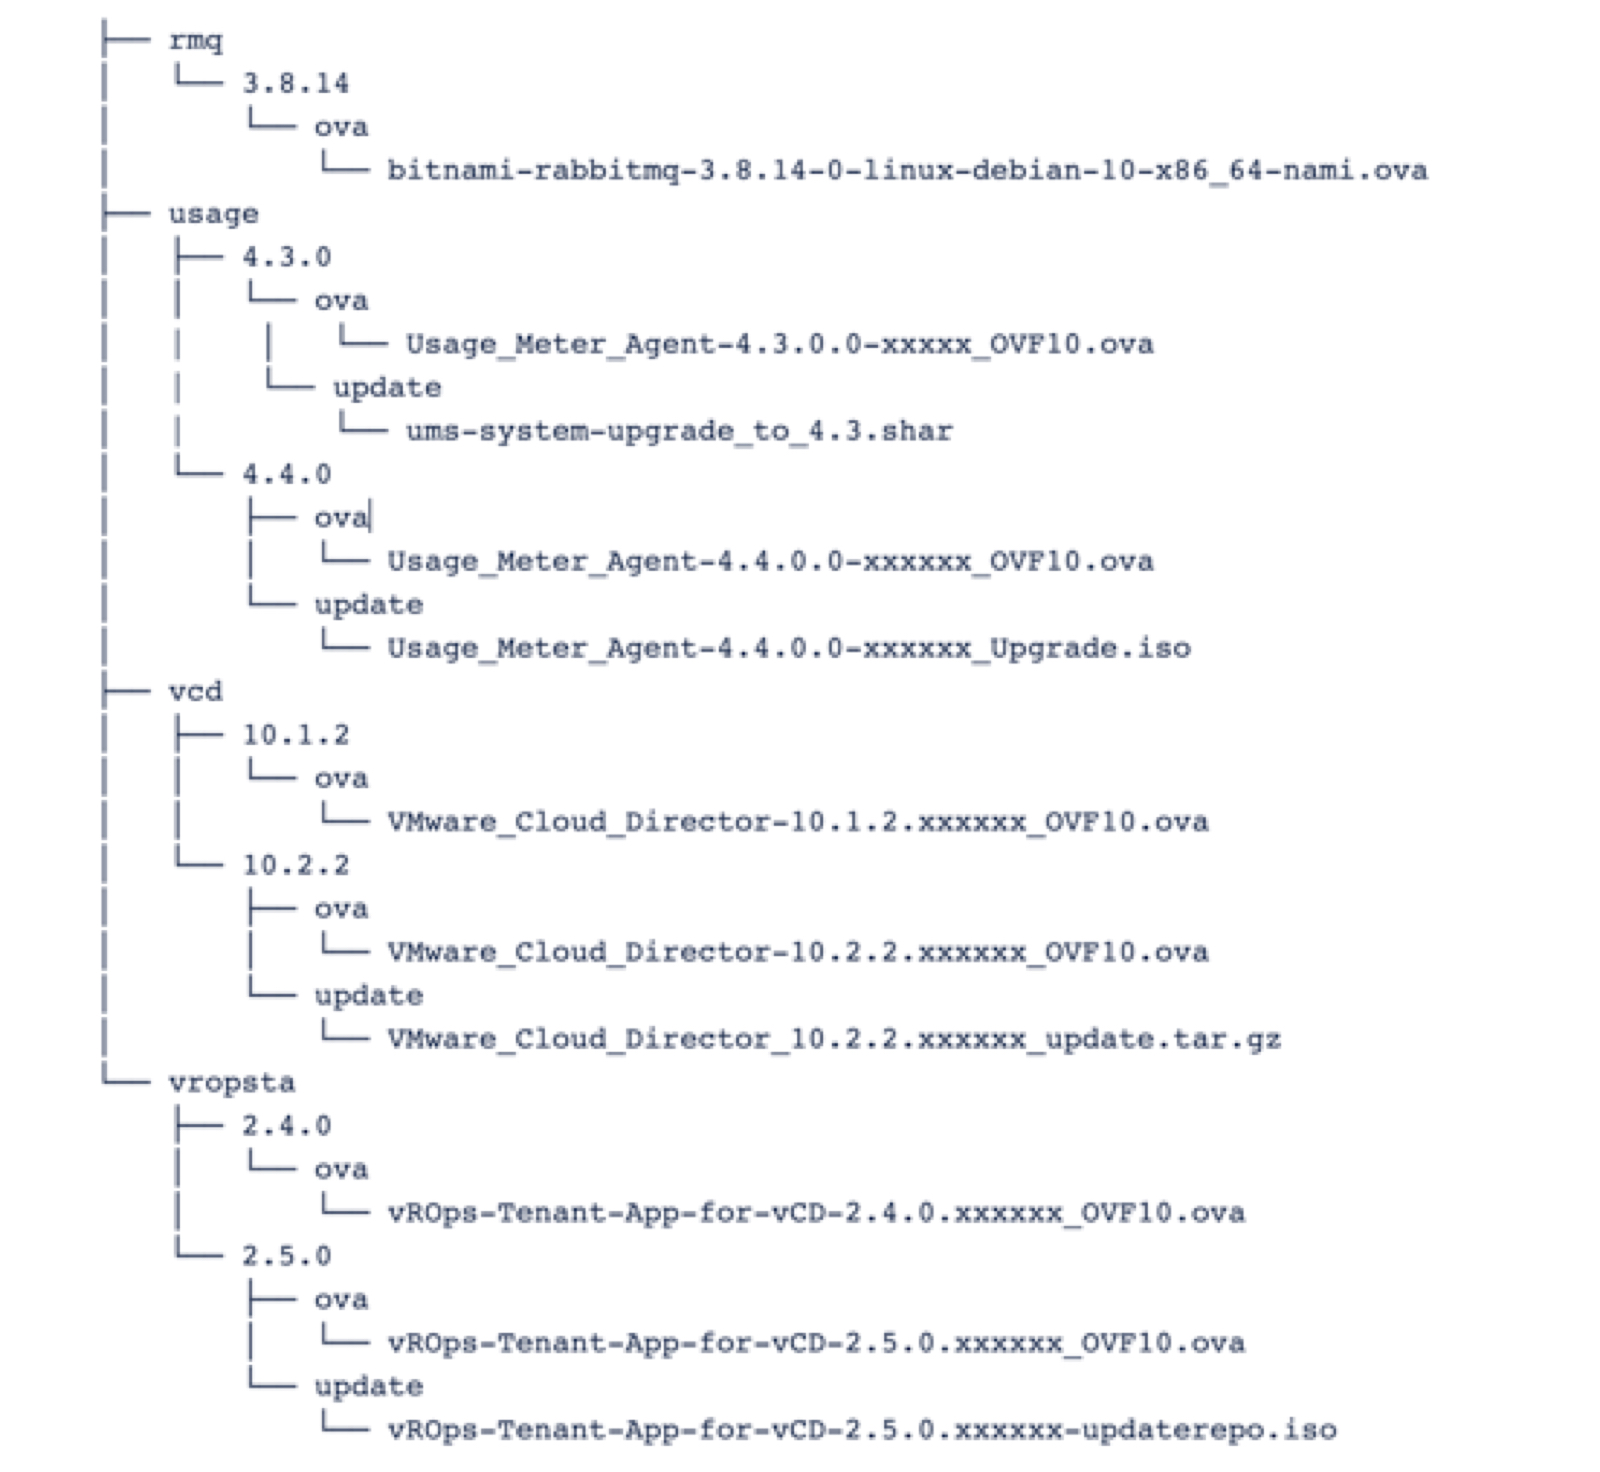
The directory structure is the following:
<product type>/<version>/ova|update/<file>
Note: The solution subdirectory specifies the version of the OVA or the patch.
Below is an example of the directory structure to be created:
What to do next #
Copy the product OVA files to the corresponding repository directory on the VMware Cloud Provider Lifecycle Manager appliance.
Example:
-
To obtain the OVA for VMware Cloud Director, go to https://my.vmware.com/
-
To obtain the OVA for vCloud Usage Meter, go to https://my.vmware.com.
-
To obtain the OVA for vRealize Operations Manager Tenant App, go to https:// marketplace.vmware.com/vsx/solutions/management-pack-for-vcloud-director#resources
-
To obtain the OVA for RabbitMQ, go to https://downloads.bitnami.com/files/stacks/rabbitmq/ 3.8.14-0/bitnami-rabbitmq-3.8.14-0-linux-debian-10-x86_64-nami.ova.
Mount an Existing Shared Directory to VMware Cloud Provider Lifecycle Manager #
You can mount an existing pre-configured repository directory to the VMware Cloud Provider Lifecycle Manager appliance.
If you do not specify the OVF property during the OVA deployment, after the deployment, you can configure the NFS by using the following commands.
Procedure
- Configure the automatic mounting of the NFS share with VMware Cloud Provider Lifecycle Manager.
echo “nfs-server:nfs_dir_path/cplcmrepo nfs defaults 0 0” >> /etc/fstab
- Mount the NFS share to VMware Cloud Provider Lifecycle Manager.
mount /cplcmrepo
VMware Cloud Provider Lifecycle Manager Certificate Management #
Configure VMware Cloud provider API and UI certificates.
VMware Cloud Provider Lifecycle Manager API Certificate Management #
After deploying the VMware Cloud Provider Lifecycle Manager appliance, VMware Cloud Provider Lifecycle Manager generates a self-signed certificates for the API and the internally used vault.
You can configure VMware Cloud Provider Lifecycle Manager to either use the self-signed certificate or your own custom certificate by providing a PKCS12 keystore containing the certificate.
VMware Cloud Provider Lifecycle Manager stores the properties for the alias, keystore name, type and password in the /opt/vmware/cplcm/config/application.properties file. To change these settings, you must update the application.properties file.
In /etc/environment, you can set the keystore password for the custom certificate by configuring the CPLCM_KEYSTORE_PW environment variable. Alternatively, you can configure it in the application.properties file for the server.ssl.key-store-password property.
VMware Cloud Provider Lifecycle Manager UI Certificate Management #
After deploying the VMware Cloud Provider Lifecycle Manager appliance, VMware Cloud Provider Lifecycle Manager generates a self-signed certificates for the UI.
You can configure VMware Cloud Provider Lifecycle Manager to either use the self-signed certificate or your own custom certificate by providing the custom certificate and key files in PEM format.
VMware Cloud Provider Lifecycle Manager stores the files with the certificate and key under the /opt/vmware/cplcm/security/certs/ directory. To change the certificate, you must replace the vcplcm-gui.pem and vcplcm-gui.key files, and restart the nginx service.
Configure custom certificate on VMware Cloud Provider Lifecycle Manager #
You can configure VMware Cloud Provider Lifecycle Manager to use a custom certificate.
To configure a custom certificate on VMware Cloud Provider Lifecycle Manager, you must provide a PKCS12 keystore containing the certificate.
Procedure
- Generate the custom certificate and create the keystore.
CPLCM_CERT_DIR=/opt/vmware/cplcm/security/certs
mkdir -p $CPLCM_CERT_DIR
key_alias=vcplcm
keystore_password=$CPLCM_KEYSTORE_PW
subj="/CN=VCPLCM, O=VMware\, Inc, c=US"
openssl req -x509 -newkey rsa:4096 -subj “$subj” -keyout $CPLCM_CERT_DIR/tmpKey.pem -out $CPLCM_CERT_DIR/tmpCert.pem -days 365 -nodes
openssl pkcs12 -export -out $CPLCM_CERT_DIR/vcplcm.p12 -name $key_alias -passout “pass:$keystore_password” -inkey $CPLCM_CERT_DIR/tmpKey.pem -in $CPLCM_CERT_DIR/tmpCert.pem
- After importing the keystore, remove the tmp key and certificate.
rm $CPLCM_CERT_DIR/tmpKey.pem
rm $CPLCM_CERT_DIR/tmpCert.pem
Configure the Maximum Number of Threads VMware Cloud Provider Lifecycle Manager Can Run in Parallel #
You can configure the maximum thread number that VMware Cloud Provider Lifecycle Manager can run in parallel.
The best practice recommendation is to configure VMware Cloud Provider Lifecycle Manager to run up to five parallel threads. If you need to configure a value greater than five, first you must increase the CPU and memory of the VMware Cloud Provider Lifecycle Manager appliance.
Procedure
- SSH to the VMware Cloud Provider Lifecycle Manager appliance console and log in as vcplcm.
- Navigate to the /opt/vmware/cplcm/config directory. cd /opt/vmware/cplcm/config
- Configure the maximum number of parallel threads.
- Open the application.properties file for editing.
vi application.properties
- Configure the maximum number of parallel threads by editing the value for the execution.max.thread.count parameter. By default, the value is set to 0. To configure a new value, you must use a numeric character.
- Save the application.properties file.
:wq!